Sharpening techniques
29th April 2012
How do I sharpen an image? Seems quite an innocuous question and one to which most new photographers would expect a relatively brief and clear answer. There is however much more depth to this than many imagine and first we need to be clear what sharpening is and why it is needed.
The camera senor is comprised of discreet cells, millions of them but few come close to the almost 100,000,000 rods and cones in each human eye. The larger we want to print the more evident these initial dots will become in the final print by way of pixellation, soft edges, etc.
My first rule, and it is absolute and unbreakable, is to do ALL sharpening on a new layer; the reason for this is that sharpening an image boots contrast thereby defining the edges within an image better. It does not as such sharpen anything. Imagine you are looking at a plank of wood that has been rough sawn and you want to sharpen it, the task is easy take a plane or sharp knife and remove the outermost extremities until it is absolutely smooth, now the edges are sharp. Now imagine you are looking at a strand of wool hanging down, you know it has a soft texture made up of a large number of well defined individual fibres. How will you sharpen this? The sharpest knife or scissors will remove the protruding filaments but as soon as you cut into the strand others will be exposed. The relevance of this to a RAW image is that in sharpening nothing can be cut away when sharpening, the perception of edges can be turned up but at the expenses of something else; you need to find the best compromise.
Bear all this in mind as we start to sharpen our image which we may commence to do on the RAW file or, as I sometimes do, skip this stage and move directly to the next. If I can produce what I want directly from the RAW I will do my sharpening on that, if I need to edit in Photoshop then I will not normally sharpen the RAW and the reason for this is twofold; partly personal preference and partly that RAW sharpening is more critical, make an error here with the level of sharpening or the extent of masking and it is locked into the file you are editing forever.
Let’s start with sharpening the RAW file, my preferred RAW processor is Adobe Lightroom but any good RAW processor should give you the same basic controls, although often they are not as well laid out. These are as seen in the next screen shot;
Photoshop RAW sharpening screen // Lightroom RAW Sharpening screen
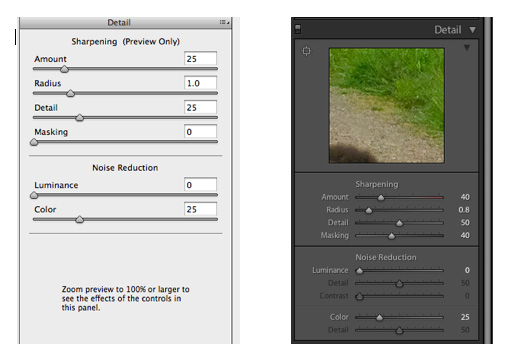
Capture sharpening, or re-focus sharpening both serve to correct the inherent lack of definition in the image file. The amount required will depend on many factors including the quality of the sensor, the resolving power of the lens and the subject matter. Adobe published excellent information on capture sharpening in Lightroom in which they recommend portrait sharpening settings of 35% across a radius of 1.2 with +20 detail and 70 masking. If you use Lightroom I suggest you find a mean setting that works well for your setup and edit the default import settings so that is applied to every image as it comes into Lightroom. Other settings which suit particular types of work or a particular lens can also be saved as a preset in Lightroom.
To evaluate sharpening it is essential to view the image at 100% on screen; Lightroom sharpening is applied to the luminance information because sharpening colour information brings in artifacts more than luminance sharpening. It is for this reason that many of the top Photoshop users will sharpen images in lab mode. The amount to be applied to each image depends to on the content of the image and the way in which you wish to present it. It is neither necessary nor desirable for every image to be sharpened to a razors edge.
The four Lightroom controls shown in the screenshot above are;
Sharpening – the amount of sharpening applied from Nil to maximum
Radius – the width selected around an object to sharpen by pixels
Detail – lower values sharpen the edges of larger items higher values thinner/smaller items
Masking – this reduces the noise which could otherwise be generated by preventing the sharpening being applied to areas of little or no detail.
In the following pictures you can see the corner of a landscape images being sharpened
a) The sharpening panel of Lightroom showing the settings being applied to the image below
img]/imgs/news/14714_9840382394f9d5319a2117.jpg
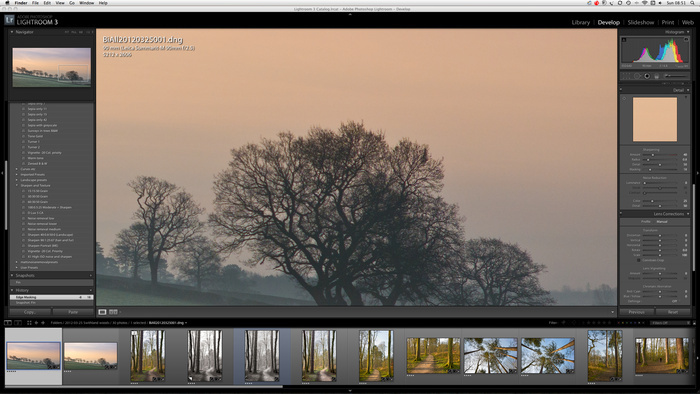
b) Full screen on the Lightroom desktop with 1:1 from corner of the scene
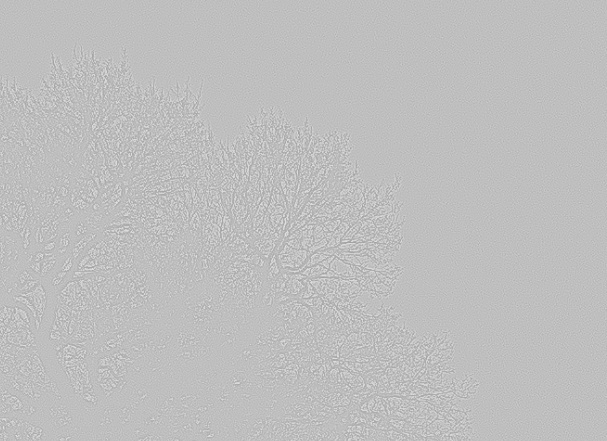
c) By holding down the ALT key while moving the detail slider you can see the extent of the sharpening detail and, where excessive sharpening is applied, the halos created around detail.
d) close up of this screen
e) Holding down the ALT key while moving the masking slider shows the size of the items being sharpened; here you can see major branches are sharpened but small twigs are not. From the speckles in the sky you can also see that some sharpening is being applied to noise in the sky. It may be preferable to ease back on the other settings or increase the masking. This noise was not visible in an A2 print but would show if a large poster were produced.
f) Close up of the above screenshot
As a starting point here are some basic settings I use for capture sharpening raw files in Lightroom;
Landscapes 40:0.8:50:0
Portraits 35:1.2:21:70
Hair and fur 90:1.0:25:67 – quite aggressive, use with care.
One point while we are still dealing with Lightroom; do not confuse the Clarity adjustment with sharpness. The clarity slider adjusts contrast and will certainly give an image more punch but it does this by adjusting contrast, principally in the mid tones. It can be responsible for halos arising later on in a Photoshop edit so use it with thought and, when appropriate apply selectively using a brush or gradient tool.
Adobe Photoshop provides a number of different tools for “sharpening.” Some of the tools do refine the definition of edges by sharpening as you expect whilst others are actually about contrast control. Contrast is important to image quality since by boosting contrast the perceived clarity is changed. But first let us be clear, excessive use of sharpening and contrast spoil as many, if not more images, than does insufficient sharpening; attention to this critically important part of post processing is vital to present your pictures at their best.
So, having got our file past the RAW stage, lets summarise the types of sharpening available to us.
The key types of sharpening I use are;
• Capture sharpening on the RAW file (this is covered above)
• Refocus sharpening – smart sharpen
• Detail improvement 1 – high pass filter
• Detail improvement2 – Unsharp mask (USM)
• Contrast boost – USM
• Web sharpen – USM
• Print or Output Sharpening – USM
Refocus sharpening
Refocus sharpening is a method I use on .psd of .tiff files to replace capture sharpening applied to the raw. After exporting the file from the raw to a .tiff file for editing I will just apply light sharpening to improve small details before commencing the edit proper.
I much prefer running this using Smart Sharpen which because of the algorithm used is less prone to creating halos or other artifacts. The extent of sharpening applied will depend on the quality of you lenses. Before I switched to Leica I used Canon “L” glass and the sharpening I needed for these lenses was in the order of 150% across 8 Pixels. With my current Leica Summarit and Zeiss Biogon lenses I need apply only 75% across 0.6 pixels. Find a setting that works for your glass and then save it as a preset, in fact I suggest you save all your sharpening settings as different presets so that by running an action you can apply them rapidly and consistently.
Before we proceed any further I would like to highlight two important considerations that apply to all sharpening in Photoshop:
1) Always apply sharpening to a duplicate layer so that it can be masked off from areas which do not need sharpening.
2) For every subsequent step in sharpening consider editing the levels before you apply the sharpening and readjusting them afterwards. As part of many of my action presets levels are initially adjusted to 30 / 235 and then reset afterwards. What this does is ensure that when sharpening is applied you do not blow the highlights.
High Pass Filter
This filter has to be run on a separate layer, no ifs, no buts, duplicate the image and the Filter/Other/ High Pass set the radius to between 2 and 4 pixels (I have presets for both). When you run the action the screen goes gray with just an outline of the major elements of the picture. Don’t worry you did it right, just change the blend mode to overlay and hey presto! Detail galore; more detail than you want of course and this is where you add a layer mask and paint out the areas where the detail is excessive. It will do wonder for bark, grass, gravel etc. But also it will add enormous visual depth to your images. By retaining detail in the major elements near the front and masking away from smaller items and the back of the picture you create a thee dimension effect on paper.
High Pass filter applied to left hand side of image
Unsharp mask (USM) Sharpening
Used at lower values USM sharpens images whilst at higher values it boosts contrast – see below.
I have two presets for sharpening one being 85% by 1 pixels and a threshold of 4 and, a more aggressive sharpening of 65% across 4 pixels with a threshold of 3. The threshold value effectively sets the level of localised contrast required before the sharpening filter is effective. It stems from a technique for printing glass plates in the 1930’s!
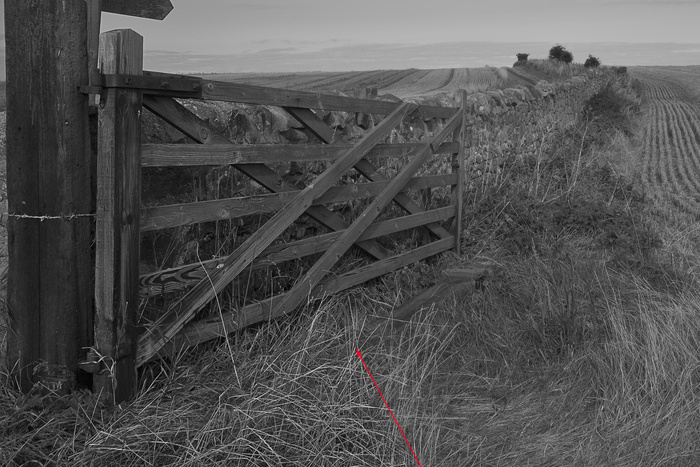
Unsharp mask (USM) Contrast Boost
High levels of USM significantly boost contrast in an image; my default starting level is 25% across 25 pixels with a threshold level of 0. I rarely use contrast boost in this way these days preferring to edit in the raw file where I can. But for dull days and difficult images I will sometimes use even higher vales, 50:50:0 occasionally and very rarely even more if a semi HDR effect is required.
High levels of USM will cause halos especially where trees, poles etc pass into a sky and it will also block shadows. It is important to mask off where required and sometimes changing the blending mode can be beneficial too. Experiment, ever picture is different.
Here an image has been processed at USM values of 50:50:0 and the top right masked off to show the original. You can see that the bottom left is darker, has a significant halo around the top of the post but also improved textural rendering in the gate.
Web sharpen – USM
The process of exporting a small jpeg for display on the web will rob it of a certain amount of detail. The web is your online catalogue of work and being the showcase for the best of what you do means you must maximize these every bit as much as you would a large print for a client. Delicate sharpening is required and the settings I use are 60% across 0.3 pixels with a threshold value of 0. This works fine for me on most 800px wide web images but I still apply it on a separate layer and mask off – even if, as is usually the case, I am exporting from Lightroom with “Sharpen for screen” ticked and set to “Standard.” I will often however reduce the opacity of the sharpened layer to get it just right.
Print or Output Sharpening – USM
My prints are all made from Lightroom these days. The Lightroom print module has within it an option to print sharpen at low, medium or high value and to specify if this is for matte or gloss paper. Low sharpen does it for me every time and since it works I don’t mess with it. I will print direct from the raw using these settings whenever I can but even if I have edited an image in Photoshop I will re-import it into Lightroom because that is my database of all images and I don’t want to have to look in different places for different things.
If you do not have Lightroom then get it! If that is not an option for you then I recommend the standard USM sharpening settings as above of 85% across 1 px with a threshold of 4. In that case when the print is to your liking save that version of the image as a separate version; I have a folder for “Print masters” within my Lightroom Catalogue.
TWO FINAL IMPORTANT POINTS
After each sharpening ”EDIT / Fade Unsharp mask” and set the blend mode to Luminosity to prevent halos and
Set your main sharpening settings up as actions in Photoshop takes all the drudgery and repetitiveness away.
And finally:
“It’s not hard to compose but it is wonderfully hard to let the superfluous notes fall under the table” Johannes Brahms; so it is with superfluous detail.
“Sharpness is a bourgeois concept” – Henri Cartier Bresson.
The camera senor is comprised of discreet cells, millions of them but few come close to the almost 100,000,000 rods and cones in each human eye. The larger we want to print the more evident these initial dots will become in the final print by way of pixellation, soft edges, etc.
My first rule, and it is absolute and unbreakable, is to do ALL sharpening on a new layer; the reason for this is that sharpening an image boots contrast thereby defining the edges within an image better. It does not as such sharpen anything. Imagine you are looking at a plank of wood that has been rough sawn and you want to sharpen it, the task is easy take a plane or sharp knife and remove the outermost extremities until it is absolutely smooth, now the edges are sharp. Now imagine you are looking at a strand of wool hanging down, you know it has a soft texture made up of a large number of well defined individual fibres. How will you sharpen this? The sharpest knife or scissors will remove the protruding filaments but as soon as you cut into the strand others will be exposed. The relevance of this to a RAW image is that in sharpening nothing can be cut away when sharpening, the perception of edges can be turned up but at the expenses of something else; you need to find the best compromise.
Bear all this in mind as we start to sharpen our image which we may commence to do on the RAW file or, as I sometimes do, skip this stage and move directly to the next. If I can produce what I want directly from the RAW I will do my sharpening on that, if I need to edit in Photoshop then I will not normally sharpen the RAW and the reason for this is twofold; partly personal preference and partly that RAW sharpening is more critical, make an error here with the level of sharpening or the extent of masking and it is locked into the file you are editing forever.
Let’s start with sharpening the RAW file, my preferred RAW processor is Adobe Lightroom but any good RAW processor should give you the same basic controls, although often they are not as well laid out. These are as seen in the next screen shot;
Photoshop RAW sharpening screen // Lightroom RAW Sharpening screen
Capture sharpening, or re-focus sharpening both serve to correct the inherent lack of definition in the image file. The amount required will depend on many factors including the quality of the sensor, the resolving power of the lens and the subject matter. Adobe published excellent information on capture sharpening in Lightroom in which they recommend portrait sharpening settings of 35% across a radius of 1.2 with +20 detail and 70 masking. If you use Lightroom I suggest you find a mean setting that works well for your setup and edit the default import settings so that is applied to every image as it comes into Lightroom. Other settings which suit particular types of work or a particular lens can also be saved as a preset in Lightroom.
To evaluate sharpening it is essential to view the image at 100% on screen; Lightroom sharpening is applied to the luminance information because sharpening colour information brings in artifacts more than luminance sharpening. It is for this reason that many of the top Photoshop users will sharpen images in lab mode. The amount to be applied to each image depends to on the content of the image and the way in which you wish to present it. It is neither necessary nor desirable for every image to be sharpened to a razors edge.
The four Lightroom controls shown in the screenshot above are;
Sharpening – the amount of sharpening applied from Nil to maximum
Radius – the width selected around an object to sharpen by pixels
Detail – lower values sharpen the edges of larger items higher values thinner/smaller items
Masking – this reduces the noise which could otherwise be generated by preventing the sharpening being applied to areas of little or no detail.
In the following pictures you can see the corner of a landscape images being sharpened
a) The sharpening panel of Lightroom showing the settings being applied to the image below
img]/imgs/news/14714_9840382394f9d5319a2117.jpg
b) Full screen on the Lightroom desktop with 1:1 from corner of the scene
c) By holding down the ALT key while moving the detail slider you can see the extent of the sharpening detail and, where excessive sharpening is applied, the halos created around detail.
d) close up of this screen
e) Holding down the ALT key while moving the masking slider shows the size of the items being sharpened; here you can see major branches are sharpened but small twigs are not. From the speckles in the sky you can also see that some sharpening is being applied to noise in the sky. It may be preferable to ease back on the other settings or increase the masking. This noise was not visible in an A2 print but would show if a large poster were produced.
f) Close up of the above screenshot
As a starting point here are some basic settings I use for capture sharpening raw files in Lightroom;
Landscapes 40:0.8:50:0
Portraits 35:1.2:21:70
Hair and fur 90:1.0:25:67 – quite aggressive, use with care.
One point while we are still dealing with Lightroom; do not confuse the Clarity adjustment with sharpness. The clarity slider adjusts contrast and will certainly give an image more punch but it does this by adjusting contrast, principally in the mid tones. It can be responsible for halos arising later on in a Photoshop edit so use it with thought and, when appropriate apply selectively using a brush or gradient tool.
Adobe Photoshop provides a number of different tools for “sharpening.” Some of the tools do refine the definition of edges by sharpening as you expect whilst others are actually about contrast control. Contrast is important to image quality since by boosting contrast the perceived clarity is changed. But first let us be clear, excessive use of sharpening and contrast spoil as many, if not more images, than does insufficient sharpening; attention to this critically important part of post processing is vital to present your pictures at their best.
So, having got our file past the RAW stage, lets summarise the types of sharpening available to us.
The key types of sharpening I use are;
• Capture sharpening on the RAW file (this is covered above)
• Refocus sharpening – smart sharpen
• Detail improvement 1 – high pass filter
• Detail improvement2 – Unsharp mask (USM)
• Contrast boost – USM
• Web sharpen – USM
• Print or Output Sharpening – USM
Refocus sharpening
Refocus sharpening is a method I use on .psd of .tiff files to replace capture sharpening applied to the raw. After exporting the file from the raw to a .tiff file for editing I will just apply light sharpening to improve small details before commencing the edit proper.
I much prefer running this using Smart Sharpen which because of the algorithm used is less prone to creating halos or other artifacts. The extent of sharpening applied will depend on the quality of you lenses. Before I switched to Leica I used Canon “L” glass and the sharpening I needed for these lenses was in the order of 150% across 8 Pixels. With my current Leica Summarit and Zeiss Biogon lenses I need apply only 75% across 0.6 pixels. Find a setting that works for your glass and then save it as a preset, in fact I suggest you save all your sharpening settings as different presets so that by running an action you can apply them rapidly and consistently.
Before we proceed any further I would like to highlight two important considerations that apply to all sharpening in Photoshop:
1) Always apply sharpening to a duplicate layer so that it can be masked off from areas which do not need sharpening.
2) For every subsequent step in sharpening consider editing the levels before you apply the sharpening and readjusting them afterwards. As part of many of my action presets levels are initially adjusted to 30 / 235 and then reset afterwards. What this does is ensure that when sharpening is applied you do not blow the highlights.
High Pass Filter
This filter has to be run on a separate layer, no ifs, no buts, duplicate the image and the Filter/Other/ High Pass set the radius to between 2 and 4 pixels (I have presets for both). When you run the action the screen goes gray with just an outline of the major elements of the picture. Don’t worry you did it right, just change the blend mode to overlay and hey presto! Detail galore; more detail than you want of course and this is where you add a layer mask and paint out the areas where the detail is excessive. It will do wonder for bark, grass, gravel etc. But also it will add enormous visual depth to your images. By retaining detail in the major elements near the front and masking away from smaller items and the back of the picture you create a thee dimension effect on paper.
High Pass filter applied to left hand side of image
Unsharp mask (USM) Sharpening
Used at lower values USM sharpens images whilst at higher values it boosts contrast – see below.
I have two presets for sharpening one being 85% by 1 pixels and a threshold of 4 and, a more aggressive sharpening of 65% across 4 pixels with a threshold of 3. The threshold value effectively sets the level of localised contrast required before the sharpening filter is effective. It stems from a technique for printing glass plates in the 1930’s!
Unsharp mask (USM) Contrast Boost
High levels of USM significantly boost contrast in an image; my default starting level is 25% across 25 pixels with a threshold level of 0. I rarely use contrast boost in this way these days preferring to edit in the raw file where I can. But for dull days and difficult images I will sometimes use even higher vales, 50:50:0 occasionally and very rarely even more if a semi HDR effect is required.
High levels of USM will cause halos especially where trees, poles etc pass into a sky and it will also block shadows. It is important to mask off where required and sometimes changing the blending mode can be beneficial too. Experiment, ever picture is different.
Here an image has been processed at USM values of 50:50:0 and the top right masked off to show the original. You can see that the bottom left is darker, has a significant halo around the top of the post but also improved textural rendering in the gate.
Web sharpen – USM
The process of exporting a small jpeg for display on the web will rob it of a certain amount of detail. The web is your online catalogue of work and being the showcase for the best of what you do means you must maximize these every bit as much as you would a large print for a client. Delicate sharpening is required and the settings I use are 60% across 0.3 pixels with a threshold value of 0. This works fine for me on most 800px wide web images but I still apply it on a separate layer and mask off – even if, as is usually the case, I am exporting from Lightroom with “Sharpen for screen” ticked and set to “Standard.” I will often however reduce the opacity of the sharpened layer to get it just right.
Print or Output Sharpening – USM
My prints are all made from Lightroom these days. The Lightroom print module has within it an option to print sharpen at low, medium or high value and to specify if this is for matte or gloss paper. Low sharpen does it for me every time and since it works I don’t mess with it. I will print direct from the raw using these settings whenever I can but even if I have edited an image in Photoshop I will re-import it into Lightroom because that is my database of all images and I don’t want to have to look in different places for different things.
If you do not have Lightroom then get it! If that is not an option for you then I recommend the standard USM sharpening settings as above of 85% across 1 px with a threshold of 4. In that case when the print is to your liking save that version of the image as a separate version; I have a folder for “Print masters” within my Lightroom Catalogue.
TWO FINAL IMPORTANT POINTS
After each sharpening ”EDIT / Fade Unsharp mask” and set the blend mode to Luminosity to prevent halos and
Set your main sharpening settings up as actions in Photoshop takes all the drudgery and repetitiveness away.
And finally:
“It’s not hard to compose but it is wonderfully hard to let the superfluous notes fall under the table” Johannes Brahms; so it is with superfluous detail.
“Sharpness is a bourgeois concept” – Henri Cartier Bresson.
